Showing posts with label spring. Show all posts

Friday, May 28, 2021

Thumbprint Animals and Insects: Fun Summer Crafts for Kids

You would never know it, but you have an incredible craft material right at the tip of your finger. You may be wondering what I am referring to, and I am here to tell you that your thumb and finger prints are a lot of fun, and you can make many different things with them. Here are some ideas on creating thumbprint animals and insects.

A cute rabbit can be created using your thumb and pinky finger print. Stick your thumb in some paint and press it on a piece of paper; next add to ears either straight up or for floppy ears add them to the sides of the bunny's head. Next draw a little nose, some whiskers, buck teeth, and eyes, and you have a great little fingerprint bunny.

Caterpillars can be made with your thumbprints as well. Just dip your thumb in some green paint and make a wiggly looking chain of prints. Next add some feet , eyes, and antennas using a pen, and you will have an awesome caterpillar.

Butterflies are easy enough using finger and thumb prints, and you can make butterflies of different shapes and sizes using different fingers as different wings. Make sure to dip your fingers in more than one color when doing these wings to add a pretty rainbow effect. Press four prints to make the wings and add the bodies, heads, and antennas with a pen or marker.

A finger print turtle is a little more complex, but it looks great when completed. Start buy making a big thumbprint in the middle. Then make two smaller prints on each side of your thumb print. This will create a circular shape. Now make longer fingerprints going around the inside circle of the shell. You should start one at the top and bottom, and have 2 on each side. This will be the turtles shell. Next use your thumb to create the head of the turtle. Use your pointer or middle finger to create hands and feet poking out of the shell. Finally use your pinky to create a tail. You can draw eyes and add details to your tortoise with a pen after the paint has dried.

Another simple thumbprint creature is the bumble bee. Start by making thumbprints with yellow paint. Next add little blue pinky prints to the side of the yellow as wings. After the paint has dried add big round eyes and zigzag patterns to the bee's body. Antennas and a smile are also a good addition to this print.

Thumbprint fish are fun and easy to make. Start by making a big thumbprint for the body. This can be whatever color you like. Next add fins and a tail using your pinky and middle fingers. Finally draw smiles and eyes on your fish when the pain or ink has dried, and be sure to add some bubbles so your fish can breathe.

These crafts are fun and simple. It is less messy to use ink pads when doing these projects, but regular poster paints work just as well. Enjoy creating these animals and see what other creatures you can come up with. You can use these ideas to create greeting cards, add fun details to pictures, and create personalized signs.

Spring Pompom and Pipe Cleaner Crafts with Kids

You can easily create spring pompom and pipe cleaner crafts with your kids. Pompoms and pipe cleaners are fun crafting mediums for kids in spring because of their versatile nature and bright colors. Here you can find pompom and pipe cleaner crafts perfect for your spring crafts with kids.

Caterpillar

With spring, come caterpillars, everyone favorite many legged friend, and this craft is cute and cuddly to make. For this craft you will need green pompoms, wiggly eyes, a hot glue gun, hot glue sticks, scissors, and pipe cleaners. Start by assisting kids as they glue several pompoms together in a row.

Then help kids cut the pipe cleaner into 12 even pieces. Bend the ends of each piece at a 90 degree angle. Then glue two pieces to the top of the head of the caterpillar like antennae. Then glue the other pieces along the bottom of the caterpillar for feet. The finished product is a cute little caterpillar for spring, and it can be placed anywhere in your home to added decoration.

Flower Bouquets

Spring flowers are always festive, and kids will like making this craft because it is pretty and is a good gift. For this project you will need large pompoms, straws, green paint, a paintbrush, a hot glue gun, hot glue sticks, scissors, and green pipe cleaners.

Start by helping kids paint the straws green; it is a good idea to place newspaper on the work area to avoid messes. Then help kids cut the green pipe cleaner into three pieces. Kids can then fold each piece in half and twist the two ends together. Then help kids pull the centers slightly apart to create leaves. Assist as kids glue the pompoms to the top of the straws, and help the kids glue the pipe cleaner leaves to the side of the straws. These pretty flowers are great for spring crafts. They can be placed in a vase or a glass jar. Add some sparkles or buttons to the pompoms for a varied look.

These spring themed crafts are easy and inexpensive to make with kids. Pompoms and pipe cleaners allow for many different projects, and these crafts will welcome spring into your home and promise good times with your kids.

Sunday, May 23, 2021

Recycled Plastic Crafts: Spring Birdhouses

Plastic can be recycled to make lovely spring items, and birdhouses are a great addition to your spring décor. This article will provide you with detailed instructions on creating several spring birdhouse crafts out of recycled plastic items.

Milk Jug

A milk jug is an excellent base for a birdhouse made from recycled materials; for this spring craft you will need two plastic milk jugs, paint, a knife, a pair of scissors, weatherproof paint, a paint brush, a hot glue gun, and hot glue sticks. Start this craft by cutting a hole in the front of the milk jug to give the birds an entryway.

Then cut two adjoining sides of the plastic milk jug out to create a plastic 90 degree angle; this piece will be the roof. Glue the roof to the top of the milk jug to cover the cap. Paint the birdhouse and allow it to dry overnight. When it is done simply fill it with food and your spring birdhouse craft is finished.

Soda Bottle

Another recycled plastic birdhouse can be made from a soda bottle. This spring craft is easy to create and use; for this recycled craft you will need two large plastic soda bottles, a hot glue gun, hot glue sticks, a knife, and paint markers. Start by cutting a wide arched doorway in the front of the bottle towards the bottom.

Then cut the center of the other bottle out; you want the width of the plastic bottle piece to be about 4 inches. Then cut the plastic to create a rectangle and twist it into a funnel shape. Use the glue to secure it in place and trim the excess plastic; this will be the roof. If you are going to hang your birdhouse tie wire or ribbon to the top of the plastic bottle before gluing the roof in lace and leave a small hole in the small end of the funnel.

When the birdhouse is formed use your paint markers to decorate the plastic bottle, and allow the paint markers to dry. A clear plastic bottle makes an interesting birdhouse, and using recycled materials for your spring crafts is always a good idea.

Peanut Butter Jar

Turn a peanut butter jar into a small bird house using only a knife, a large soda bottle, a hot lgue gun, and glue sticks. Start by using a knife to cut a doorway into the front; then cut off the top of a soda bottle and glue it to the lid of the peanut butter jar. This simple birdhouse is sturdy and can be hung easily.Using recycled plastic bottles and containers to create spring birdhouses is easy and inexpensive. So try these crafts for your outdoor birds this spring!

Tuesday, April 20, 2021

Unique Holiday Crafts for Kids in May


May is a great month for celebrating unique holidays with your kids. Craft projects provide fun and excitement for kids on holidays. Here you will find crafts you can do with kids for the unique holidays in May.

Colorful Socks

A unique holiday in May is Lost Sock Memorial Day, and in honor of this holiday your kids can make colorful socks. For this craft you will need fabric paint in a variety of colors, paper plates, sponges, socks, and scissors. You should also cover the work area with newspaper and have a place where socks can dry.

Then squeeze some paint onto the plates. Help kids cut the sponges into smaller pieces and shapes. Then assist kids as they paint the sock using the sponge. Help them by showing them how to dip the sponge in the paint and dab it on the plate to avoid excess paint. Pressing the sponge to the sock in a variety of ways can also provide different results. Have fun with your kids by making unique socks for this fun May holiday

Lucky Penny Favors

Lucky Penny Day is another holiday that can be fun for crafts. For this project you will need some pennies, crayons, paper, markers, and scissors. You can also use other coins if you like, and larger fake coins also work well with younger kids.

Start this holiday craft by help kids do a rubbing of the coins. Demonstrate this technique to kids by placing the coin under the paper. Then rub the side of a crayon gently over the paper where the coin is located. Applying the right amount of pressure will replicate the image of the coin.

Then let kids write lucky coin or penny somewhere on the coin. To celebrate this holiday you can also help your kids make many lucky pennies and give them away to people for fun.

Tours of the World

National Tourism Day is also in May, and this holiday provides a lot of fun craft ideas for kids. An easy project requires only, paper, crayons, and pictures of places around the world. Have fun looking at places around the world with your kids. Then decide on a couple of places and help your child draw the place; the more imaginative the better. Place the drawings in a scrapbook or frames to remember your tour of the world with your kids.

These crafts are easy and fun to create with your kids in May. Fond memories and laughs are guaranteed when you celebrate these unique holidays.

Recycled Spring Coffee Can Crafts for Kids


Spring is a wonderful and refreshing time, and during your spring cleaning you may realize you have a lot of old coffee cans. Instead of throwing away these priceless items you can create fun spring crafts with your kids. These spring coffee can craft ideas will provide you with all the necessary information to complete several spring coffee can crafts with your kids.

Drum

With the spring comes backyard fire pits, and there is not better place for a drum circle than a fire pit. Kids can make turn recycled coffee cans into drums. For this craft you will need a coffee can, paint, and some small metal objects such as screws, nuts, or bottle caps.

Start by helping kids paint the entire coffee can; and remind kids to take the lid off and paint it separately so it doesn't get stuck to the can. When the coffee can has dried place the metal items inside it and seal it shut. You can also apply tape around the lid if your kids want to use the drum as a shaker instrument. This spring craft is a great way to use recycled items with your kid.

Lantern

A fun and easy recycled spring coffee can craft for kids is a lantern. For this spring craft you will need a coffee can, a marker, a hammer, a screw driver, and a candle. You may also want to place a little water in the bottom of the can before you place the candle in it to make it safer.

Help kids use the marker to draw a pattern on the coffee can, but remember to only use dots for your pattern. Then use the screw driver and the hammer to bang holes into the coffee can; it is helpful to have the coffee can held in a clamp or braced between to heavy items so it does not move.

After you have punched all of the holes into the can you can put a candle in it and watch it glow! This recycled coffee can craft is a fun way to make lawn decorations with your kids; and spring is the perfect time to start decorating your lawn.

Birdhouse

Coffee cans should be recycled into spring birdhouses. This easy craft is a great way to introduce kids into wildlife and birds. For this spring craft you will need a coffee can, paint, wire, a hot glue gun, hot glue sticks, a knife, and some tree bark.

Start this craft by helping kids paint the coffee can water color they like. Then cut a hole in the lid of the coffee can that is big enough for a bird. Tie the can with wire and glue the tree bark to the top of the can like a roof. Replace the lid and the recycled coffee can has become a birdhouse perfect for spring.Spring crafts are fun to do with kids, and recycled coffee cans should be the medium for many kid's crafts. Try these spring inspired craft ideas with your kids.

Saturday, April 17, 2021

Spring Home Decorating Ideas Using Recycled Materials


Spring is a great season for bringing new life to your home decorating projects. Spring is fresh and fertile, and these ideas will show you how to use recycled materials in your spring themed home decorating projects.

Collage Photos

Flowers, birds, bunnies, plants, fruits, and vegetables are all spring images. Use old magazines to create collages to display on your wall. Cut out spring images and glue them to pieces of heavy paper. Then place the images inside old frames and hang them on different areas of the wall. You can use multiple images or you can use large pages with single images. This craft is great for adding style while recycling materials.

Plastic Lid Wall Hanging

Make a spring themed wall hanging using plastic lids, paint, paintbrushes, scissors, and ribbon. Start by painting all of the lids a solid color. Then decide on the message you want to write on your banner. Spring and bloom are good word choices for decorating during this season. Then paint each letter of your message on a different lid. Cut holes in the sides of each lid and use the ribbon to tie them together. Hang this project in your home for instant décor.

Dried Flower and Twig Candle Holders

Add that spring touch to your candles by placing them in these handmade holders. For this idea you will need twigs, ribbon, dried flowers, hot glue, and jars. Start by tying the ribbon around the lip of the jar and using the glue to secure it in place. Then glue some flowers and twigs to the ribbon to add more seasonal charm Candles complete the look.

Bird's Egg Centerpiece

For this centerpiece you will need grapevines or twigs. You will also need glue, eggs, a needle, paintbrushes, and paint. Start making the nest by wrapping the vines or the twigs together in a circle. Add more vines until the circle is smaller and the bottom is covered. Use glue along the way to secure it in place. Then use the needle to poke a small hole in the egg and blow out the contents. Finally paint the egg and place in the nest for your centerpiece.

These spring themed decorations are fun and easy to create. Try these ideas in your home decorating themes for spring, and you will love the results.

Friday, April 16, 2021

Spring Handprint Crafts for Kids Using Paint


Kids love celebrating spring with crafts, and handprint crafts using paint are easy and fun. Paint provides kids with amusement and allows them to develop their creativity. Handprint crafts are an easy way to incorporate paint into your child's projects. This article will discuss how to create spring handprint crafts while using paint with your kids.

Sunflower

Creating a sunflower using handprints and paint is easy and fun for kids. For this craft you will need yellow paint, black paint, two paper plates, a large piece of paper, and scissors. You can also add ribbon to the final product so you can hang your spring craft.

Start by pouring some yellow paint on a plate; also pour black paint on another plate. Then help kids dip the tips of their fingers into the black paint. Using their fingers, kids then can create the center of the sunflower. Start by making a circle with one fingertip in the middle of the paper. Then add more circles around the first. Continue with this process until you have a very large circle.

Let kids wash off the black paint. Then help kids dip their hands into the yellow paint. Assist kids as they add their handprints to the flower to make petals. Make sure the palm is closest to the black center as possible. Help kids add petals by going around the center of the flower to finish this spring themed craft.

Spring Wreath

Another fun spring craft for kids is a wreath. Kids can use paint and handprints for this fun project. For this craft you will need green paint, a pencil, paper plates, a paintbrush, and some other colors of paint such as yellow, pink, and red. Heavy paper, scissors, and ribbon allow this craft to be hung.

Start by placing the paper plate on top of the paper and use the pencil to outline the circle lightly. Then pour the green paint onto a paper plate. Also help kids pour a little of the other colors of paint on another paper plate.

Then help kids dip their entire hand into the green paint. Let kids use the paintbrush to add different colors of paint to their fingertips. They can also choose to dip their fingers in the other colors if they like. Then assist as children press their hands to the paper. Make sure the handprints follow the circle you have traced onto the paper previously. Continue until the entire circle is covered. When the craft has dried, you can add ribbon to hang it for spring.

This spring craft is a great way for kids to have fun with paint and their hands. It is fun and easy, and it does not require a lot of skill. Try these spring ideas with your kids for a creative activity.

Wednesday, April 14, 2021

April Bulletin Board Ideas for Preschool


Preschool kids love creating projects for the bulletin board, and these April themed ideas are fun for the entire class. April has a lot of holidays to choose from when designing the bulletin board. This article discusses April bulletin board ideas that are great for preschool.

Arbor Day Hand Print Tree

Arbor Day is a holiday to remember in April. Preschool kids will love this bulletin board idea. You will need green paint, paper plates, brown paper, scissors, and butcher paper. Start by covering the bulletin board with the paper.

Pour paint onto each plate and help kids press their hands into the paint. Then they can press their wet hands onto the brown paper. Help kids cut out their handprints after the paint has dried. Make a tree trunk for the leaves using the brown paper. Add the hand prints to the tree to finish this April themed bulletin board in remembrance of Arbor Day.

Umbrellas

Another April bulletin board idea is umbrellas. You will need blue butcher paper, white oak tag, construction paper, scissors, pencils, and umbrella shaped cut outs. You can also use coloring pages that feature an umbrella is you like. Markers or crayons are also needed to color the umbrellas with.

For this bulletin board kids should color the umbrellas and right their names on them. Allow the preschool kids to personalize their umbrellas to their liking. While they are working on their part cover the bulletin board with the butcher paper.

Then use the oak tag to create a large rain cloud. Use the markers to write the name of the class on the rain cloud. Then cut out raindrops from the construction paper. Add the rain drops and the cloud to the center of the bulletin board.

Help kids attach their umbrellas to the April themed bulletin board and your preschool kids will enjoy displaying their work.

Creating bulletin boards with preschool kids is fun for them; it also helps improve their confidence and motor skills. Try these fun bulletin board ideas with your preschool students this year, and you are guaranteed to have a bulletin board you can be proud of.

Tuesday, April 13, 2021

Inexpensive Home Decorating Ideas for Spring


Spring brings us a breath of fresh air, and this feeling can carry over into your home decorating ideas. Sunshine, pastels, and growth are popular themes for spring. This article will provide you with inexpensive home decorating ideas for spring.

Eggshell Art

Eggshells are undervalued as garbage, but they can easily be turned into something beautiful with a little creativity. Try using eggshells to create candle holders or vases for your home decorating needs. Simply break up the eggshells into smaller pieces and use glue to add a mosaic look to any object you like. You can dye the eggshells using inexpensive dye kits that are easily acquired during the Easter season. You can use watercolor paint to add color to the shells after they have been glued to your home decorating items.

Eggshell art is a fun way to add that special spring feeling to your home décor and it works well with the pastel color theme of spring. Eggshells also enhance the idea of growth and new beginnings which is popular during spring time.

Seedlings

Another inexpensive decorating idea for your home during springtime is starting some seedlings. Seedlings look lovely in teacups, eggshells, and old glass jars. If you start your seedlings in spring they will be ready in time for your to plant them in the garden in summer.

Try filling jars and other items with some stones and dirt. Then plant inexpensive seeds in them. You can even plant vegetable seedlings to transplant later. Pea plants and tomatoes look great as décor, and you can also start flower seeds or bulbs. If you choose to use eggshells gently remove only the top fourth of the shell. Then place several in a bowl surrounded by rocks or marbles to balance them. You can also place a single egg in a shot glass for a simple look.

Curtains

Spring is a good time to change your curtains; this will allow for the sunshine and warm breeze to enter your home. Lace and thin, gauzy materials are great for spring, and curtains can be made easily using fabric glue, scissors, an iron, and fabric. Sheets sell for inexpensive prices at thrift shops, and light fabric is often pretty cheap when bought in bulk.

Use the glue and iron to make simple straight edges all the way around. Make sure the hem on top edge is wider so the curtain rod can fit through it. These simple curtains add a wonderful ambiance to your home when decorating.

These ideas are inexpensive and easy to make. They take little time to complete, and they will add that spring fresh feel to your home.

Thursday, April 20, 2017

Miniature mushrooms 10 you choose colors fairy garden...


Miniature mushrooms 10 you choose colors fairy garden accessories tiny plant gnome mini minature terrarium miniature for elf garden woodland


from Tumblr http://ift.tt/2pVZuoc
via IFTTT

Saturday, April 4, 2015

Monday, April 8, 2013

Homemade Wedding Decorations: Spring Butterflies


Spring is a lovely season for weddings, and this season should be incorporated into wedding decorations. Butterflies first make their appearance during the spring, and they are the perfect theme for spring wedding. This article will provide you with detailed instructions on creating three homemade wedding decorations with spring butterflies as the theme.

Many of these projects use a butterfly template. Please check this post for a bunch of free buttterfly templates.

Garland
A butterfly garland is a lovely spring wedding decoration, and this homemade spring craft can be made easily and quickly. For this homemade spring wedding decoration you will need coffee filters, watercolor paints, a paintbrush, water, pipe cleaners, scissors, and ribbon.
Start this homemade spring wedding decoration by wetting all of the coffee filters and the paint. Add some drops of paint to the filters and the colors will swirl together. Allow the coffee filters to dry completely.
Then fold a pipe cleaner in half and pinch the coffee filter in the middle. Place the folded end of the pipe cleaner on top of the pinched section of the coffee filter and pull the ends through. Wrap the pipe cleaner around itself until you reach the other side of coffee filter and curl the ends of the pipe cleaner to make the butterflies antennae. Cut a long piece of ribbon and hook the butterflies on to the ribbon by their antennae. This homemade spring wedding decoration is easy to complete and it will look lovely on your big day.
Centerpiece
Butterflies make a beautiful spring wedding centerpiece; for this homemade decoration you will need a butterfly template, cardstock in various spring patterns, scissors, glue, fishing line, a clear vase, flowers, and a tree branch. You can use fake flowers for this craft if you like.
Start this homemade wedding decoration by tracing the butterfly template onto the cardstock. You can make a butterfly template easily by finding an image of a butterfly and cutting it out of cardboard. Next cut out several butterflies and glue pieces of fishing line to the backs of the butterflies.
After the glue has dried tie the butterflies to the tree branch so they dangle nicely and fill the vase with flowers. Place the branch across or on top of the vase, and add a little glue to secure it if you like. This homemade spring butterfly decoration will look lovely as a wedding centerpiece.
Place Card Holder
You can make beautiful butterfly place card holders for your homemade wedding decorations. For this wedding craft you will need a butterfly template, scissors, patterned cardstock, a pencil, glue, and a black marker. Start this craft by tracing the template onto the cardstock, cut the butterflies out, and color the bodies and antennae black.
Next lightly bend the butterflies in the middle so the wings are closer together. Add a line of glue halfway up the body of the butterflies and attach two butterflies together. Make sure to leave a space in between the butterflies on top to place the name card. This spring wedding decoration uses butterflies in a creative and fun way.
Spring is a wonderful season for weddings, and it is a lot of fun to incorporate butterflies into your homemade wedding decorations. These homemade wedding decorations feature spring butterflies, and they will make your wedding unique and lovely.


Wednesday, June 20, 2012

How to Easily Make a Floral Tiara for a Summer or Spring Wedding

You can make your own floral tiara for your spring wedding. Floral accessories are a must for spring weddings, and a tiara is perfect for the bride's big day. This article will provide you with detailed instructions on creating the perfect floral tiara for your special day in spring.
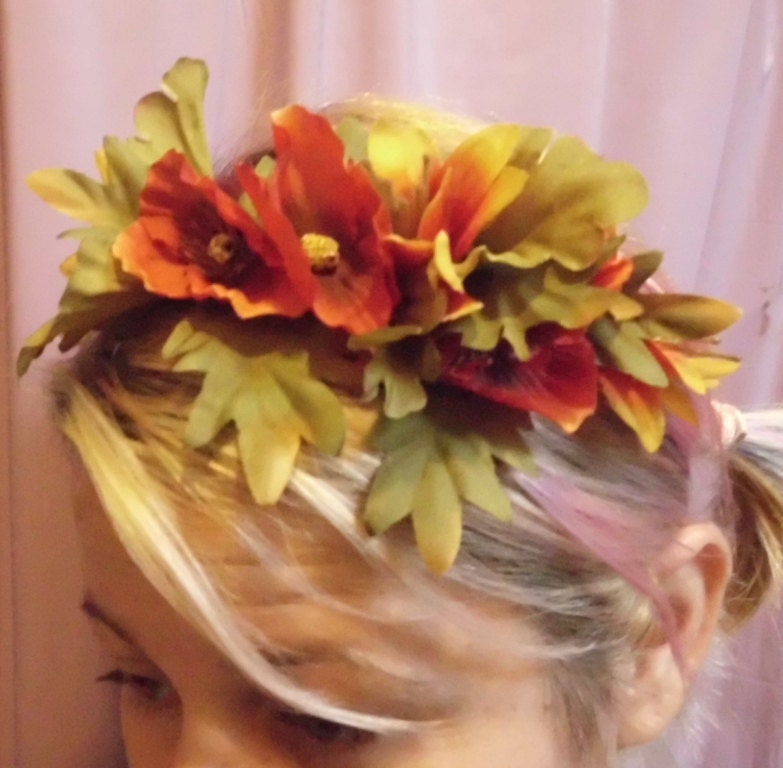
Flower Crown Sale Fall Fire Circlet Tiara Fairy Hair Accessories Halo Headband
This crown is on Sale for only $7 Here 

When creating a vine tiara you will need a few thin vines, a bowl of water, string, scissors, and wire. Start by bending and wrapping a few vines together into an appropriate length for the tiara. Then bend the length of vines to make a U shape. Only bend the vines as far as they will go, and tie the string around the other end of the vines. This will keep the bended shape in the tiara.
Soak the vines in the bowl overnight. If the vines need to be bended more to make the correct shape, you can undo one end of the string, bend it more, and reattach the string. After the vines have dried wrap the second side in wire, trim the ends, and remove the string. The crown will keep its shape; you can add combs to the sides of the tiara using hot glue if you would like more stability.
Adding floral accents to your crown is important for spring weddings. Springs leaves for several appropriate flower choices such as daisies, anemones, apple blossoms, and lilies are all perfect spring flowers for a bride, and there are plenty of colorful flowers to add detail and beauty to tiaras. Begonias, cherry blossoms, and dahlias are bright flowers that will stand out in a crown.
Using a hot glue gun to add items is the best option, and there are many other items that look great in a spring wedding tiara. Adding pine cones, leaves, and acorns are a fun idea for these floral tiaras, and curly bits of vines, shells, feathers, and dried berry clusters add accent to these pieces. Adding beads, wire, gems, feathers, and glitter pigment will make your tiara sparkle. Jewelry findings, iridescent marbles, and pearls also add shine to your spring wedding crown.
Making a floral tiara for your spring wedding is inexpensive and easy. The tiara is a focal point of any outfit, and a handmade crown will make you really stand out this spring.

Gishmas 2021 List

 Day 1 Challenge: December 20th – Image or Video What powers GISH? Love, actually. So, let’s spread some cheer. Using the GISH App or search...